Many years ago, too many to count, I started a YouTube channel, Step by Step Science. More than 550 videos and 200K plus subscribers later, I still remember the impulse for starting the whole thing….
Although at some point I had probably learned about the workings of concave and convex lenses and mirrors, it was coming to the time of year when I had to teach the subject to my 9th grade physical science students. And I did not know where to start. So now I had to learn it all again, and to be able to teach it I had to put it all together in an easy to understand set of lessons. That’s what we do as teachers, learn something so that we can teach it to others.
After looking through various texts I had lying around and searching the internet for the most useful explanations, I came across what is now one of my favorite online resources: The Physics Classroom.
As I clicked through their very thorough pages of explanations for convex and concave lenses and mirrors, including the discussions of object and image locations, real and virtual images, image orientation and magnification, I became increasingly frustrated about how I was going to be able to put this all together into a logical, understandable sequence of lessons for my students.
In an attempt to establish a logical framework in my own head, I put pencil to paper practicing all the possible permutations of lens and mirror ray diagrams for each of the possible object locations (there are a total of twelve). It seemed a little overwhelming until I realized that you really only need to remember two things: parallel – F and F – parallel. Well, maybe this is a bit of an over simplification but it is a great place to start.
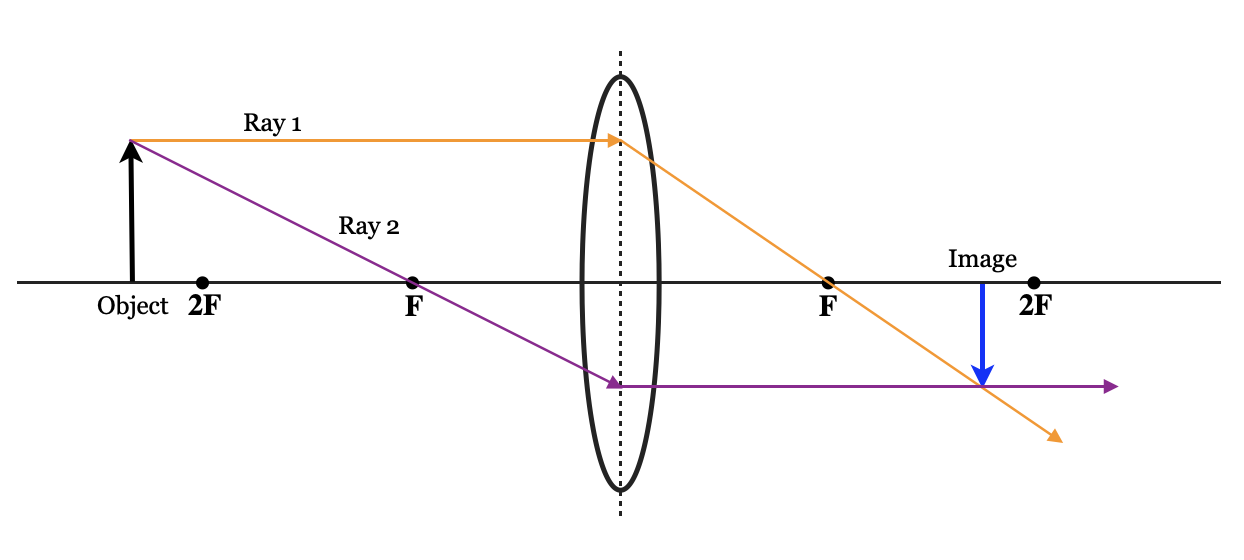
As I show my students, for every object location, to locate the image you only need to draw two rays and the two rays are drawn the same way regardless of the object location or optical device. The first ray is drawn so that it enters the lens parallel to the principal axis and is refracted so that it exits the lens through F (the focal point). The second ray is drawn so that it enters the lens through F and is refracted so that it exits the lens parallel to the principal axis. The image is located at the point of intersection of these two rays. Of course mirrors reflect rather than refract, but the answers are the same as those for a lens.
As is the case with so much of teaching basic physics concepts, you have to look for the patterns. Patterns that make everything fit together into a logical sequence of lessons that start at point A lead your students to higher order thinking.
So now that I had figured out how to teach concave and convex lenses and mirrors, I wanted to show as many students as possible that they too could figure it out. That’s where the idea for the YouTube channel came from. A desire to show others that many of these topics are not really that complicated and that if broken down into an easy to understand set of steps they too can have success in their math and science classes.
My 4 part video series on ray diagrams has turned out to be quite popular, as you can see from the first video in the series which has more than 1 million views. For further learning, here’s a link to all my optics videos: Optics: Ray Diagrams, Reflection, Refraction, Thin Lens Equation
